Create Your First Workflow
Build powerful automation workflows that execute automatically before a call, after a call, or after a chat.
Visual Builder
Drag-and-drop interface for creating complex workflows easily.
AI-Powered
Intelligent decision nodes that analyze conversations in real-time.
Flexible Tools
Send emails, SMS, webhooks, schedule appointments, and more.
Auto-Execute
Workflows run automatically on pre-call, post-call, or post-widget triggers.
Understanding Workflows
A workflow is a powerful way to automate complex tasks before or after a call or chat. It's a chain of automatic actions that handle your follow-up work: sending emails, scheduling appointments, creating tickets, updating your CRM, invoking webhooks, all happening seamlessly in the background without any manual effort.
💡Workflows Are Optional
You don't always need workflows! For simple tasks, just instruct your agent directly. For example, you can tell your agent: "send email to tom after the call ends" and it will handle it automatically.
We recommend using workflows for:
- •Complex tasks that require multiple steps or conditional logic
- •Tasks requiring complex thinking from a slower but more powerful AI model
- •Tasks that might impact call performance - offload them to run after the call to keep your agent responsive
Understanding Workflow Components
Node Types
Start Node
The beginning point of every workflow. This is where your automation starts when triggered by an event (like a call ending). It automatically receives all the information from the conversation.
Decision Node
The brain of your workflow. It analyzes what happened in the conversation and decides what to do next. You can create multiple paths like "Schedule Appointment", "Send Information", or "Create Ticket" based on what the customer needs.
You'll configure:
- • A clear title describing what decision is being made
- • Instructions telling the AI what to look for
- • Different paths the workflow can take based on the decision
Tool Node (Execute Node)
The action taker. These nodes actually do things - send emails, create calendar events, send text messages, or update your systems. The AI automatically writes the content based on what was discussed in the conversation.
Connections (Edges)
- →Visual lines connecting nodes define the flow of execution
- →Must connect from output handles (right side) to input handles (left side)
- →Cannot create circular loops
Step-by-Step Example: Creating a Support Issue Handler Workflow
Let's build a simple workflow that automatically handles support issues after a call ends. This workflow will check if the customer reported any issues and route them appropriately - urgent issues go directly to a technician via SMS, standard issues create a support ticket via email, and general inquiries need no action.
Start Creating Your Workflow
First, let's set up the basics:
- Navigate to your agent in the portal
- Click on the "Workflows" tab
- Click "Create Workflow" button
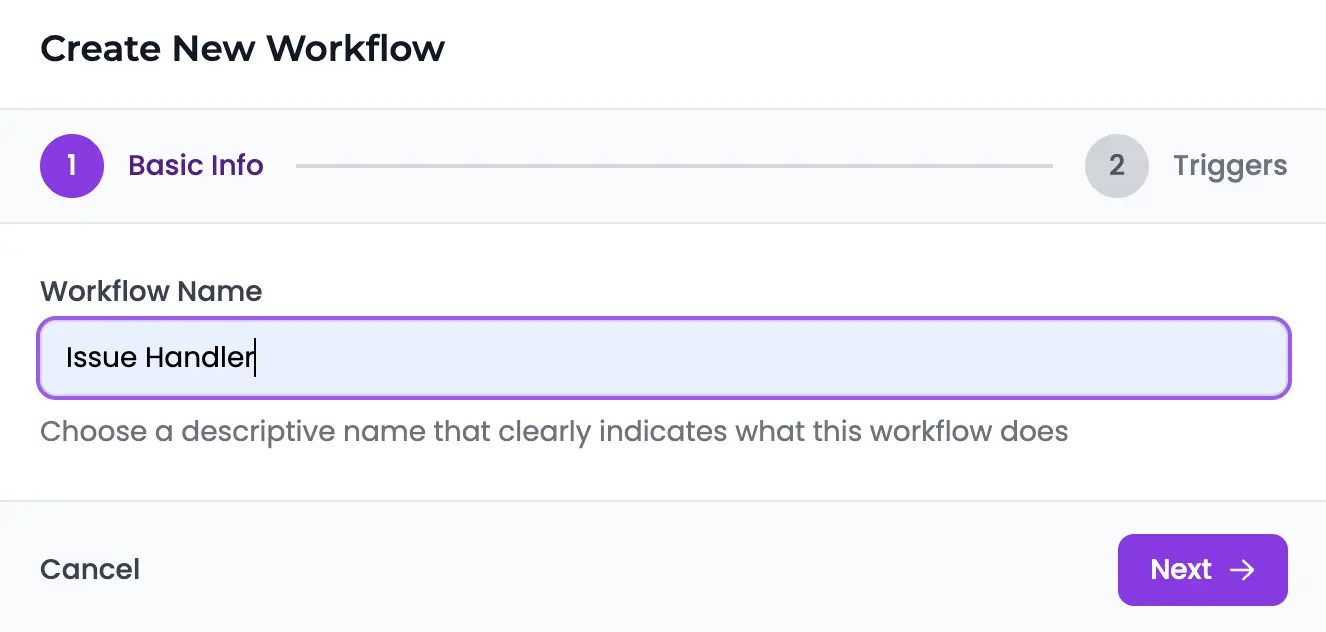
Step 1 of 2: Basic Information
Enter the workflow name: "Issue Handler"
Press "Next" to continue

Select Workflow Triggers
Now, let's choose when this workflow should run:
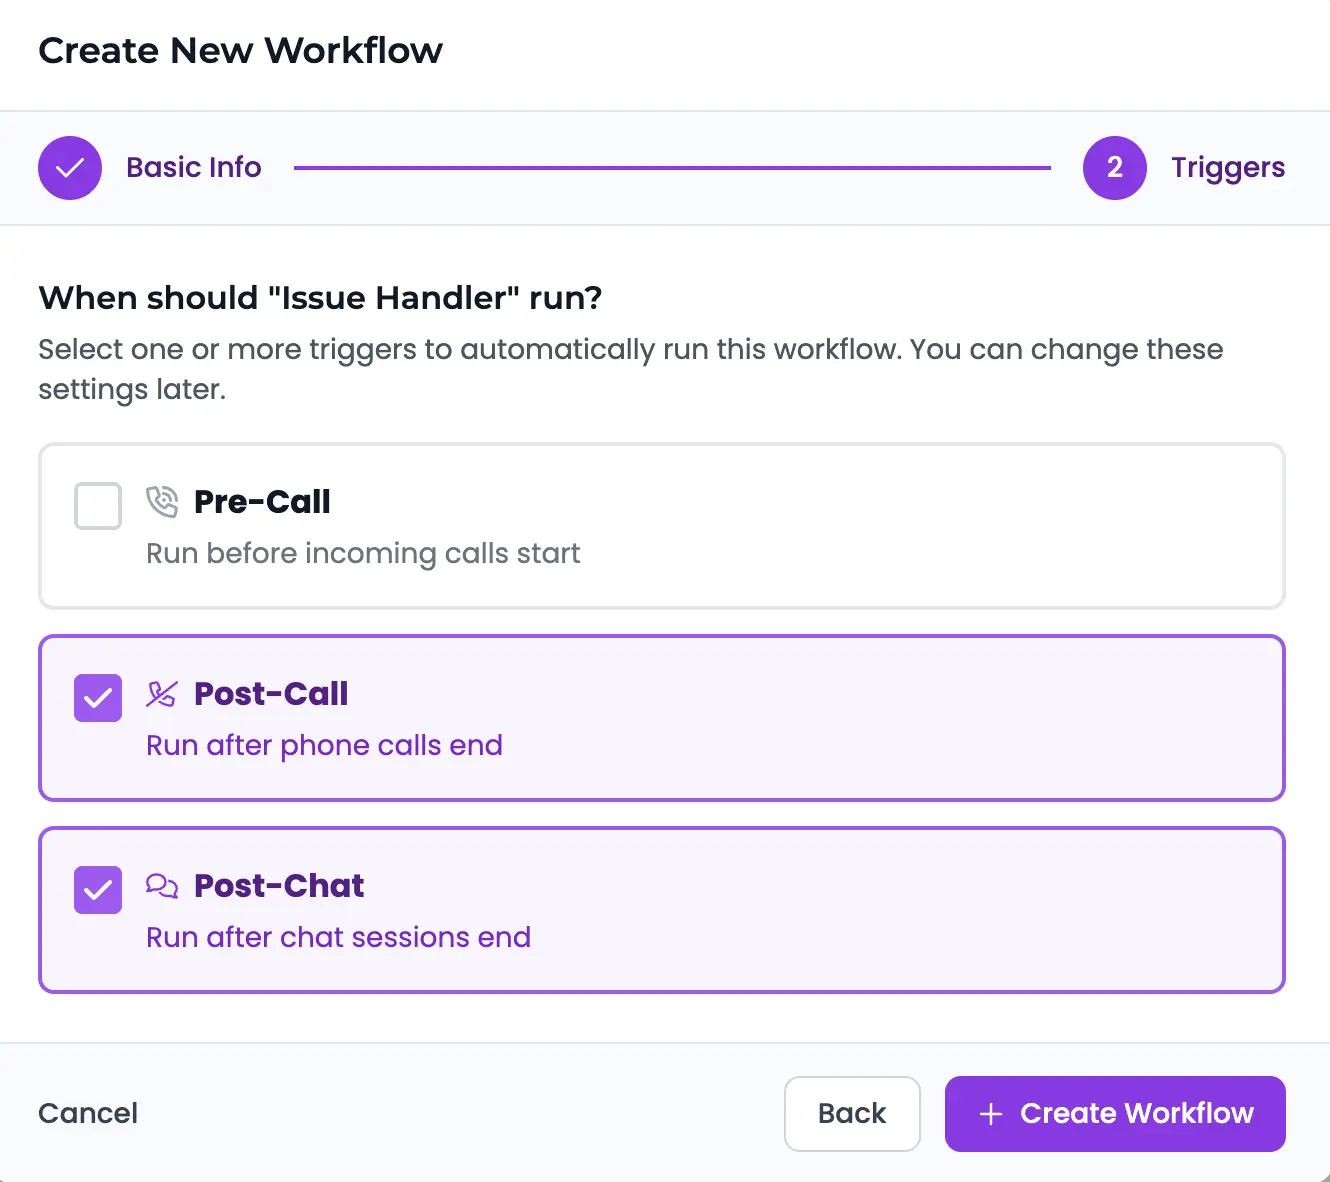
Step 2 of 2: When should this workflow run?
Since we're handling support issues after calls, select:
- Post-Call
Run after phone calls end - perfect for handling issues discussed during the call
- Post-Widget
Run after chat sessions end - handle issues from chat conversations too
⚠️ Important: If you don't select any triggers, the workflow won't run automatically. You can always add or change triggers later from the workflow page.

After selecting your triggers, click "Create Workflow" to continue. You'll be redirected to the workflow builder where you can add nodes.
Add an Issue Severity Decision Node
Now let's add a decision node to check if the customer reported an issue and determine its severity:
Add the node:
- Drag a Decision Node from the left panel onto the canvas
- Position it to the right of your Start node
- Click on the Decision Node to configure it
Configure the decision:
Title:
"Issue Severity"
Instructions:
"Analyze if the customer reported any technical issues or problems. Classify based on severity: - Urgent Issue: System is down, critical functionality not working, business operations affected - Standard Issue: Minor bugs, feature questions, non-critical problems that need support - No Issue: General inquiry, product information, or already resolved during the call"
Outputs (add these three):
🔗 Connect it: Draw a line from the Start node's output to the Decision node's input
Add Actions for Each Issue Type
Now let's add specific actions based on the issue severity:
Path 1: Urgent Issue → Alert Technician
- Drag a Tool Node to the upper right
- Click it and select "Send SMS" as the tool type
- Configure:
- • Title: "Alert On-Call Technician"
- • Phone Number: Your technician's phone number
- • Instructions: "Send urgent alert with customer name, phone number, and brief description of the critical issue"
- Connect from Decision's "Urgent Issue" output to this node
Path 2: Standard Issue → Create Support Ticket
- Drag a Tool Node to the middle right
- Click it and select "Send Email"
- Configure:
- • Title: "Create Support Ticket"
- • To: [email protected] (your helpdesk email)
- • Instructions: "Create a support ticket email with subject line 'New Support Ticket - [Customer Name]'. Include customer details, issue description, and conversation summary"
- Connect from Decision's "Standard Issue" output to this node
Path 3: No Issue → No Action
For the "No Issue" output, we don't need to add any tool node. This path will simply end without taking any action.
💡 This is perfect for general inquiries that were fully resolved during the call and don't require any follow-up.
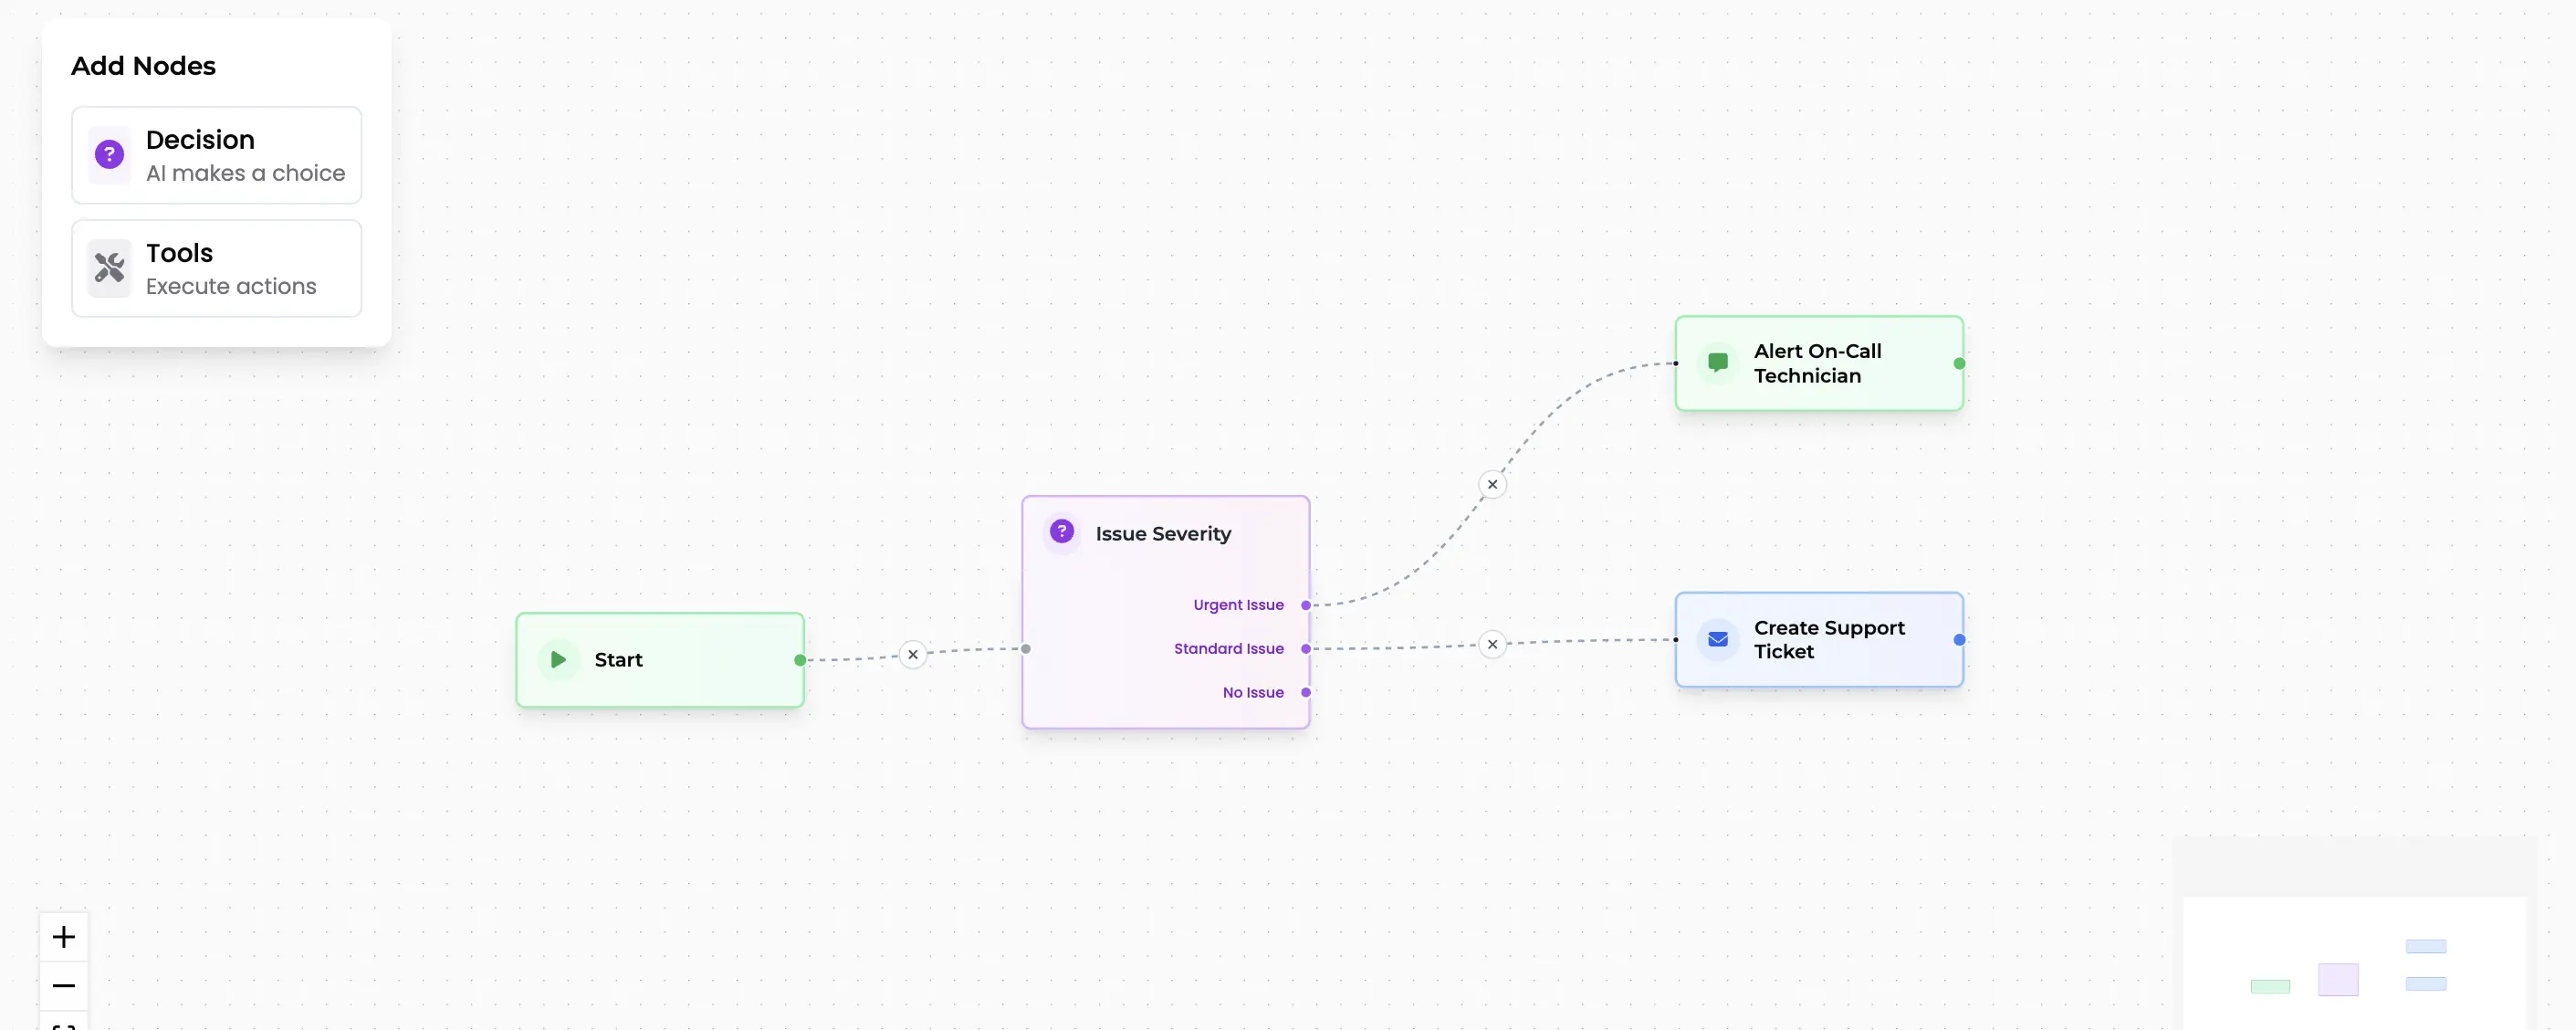
✅ Your Workflow Should Look Like This
After completing the steps above, your workflow canvas should display this structure:

The workflow shows: Start → Issue Severity (Decision) → Three output paths (Urgent Issue, Standard Issue, No Issue)
Your Complete Workflow
Great! You've successfully built a support issue handler workflow.
This workflow will now:
- Check every call for reported issues
- Alert technicians via SMS for urgent problems
- Email support team for standard issues
- Take no action for general inquiries
Workflow is Now Active!
Great! Your workflow is ready and will run automatically based on the triggers you selected:
🎉 Your workflow is now live!
- ✓ Will run automatically after every phone call
- ✓ Will run automatically after every chat session
- ✓ Will check for reported issues and handle them appropriately
Managing Triggers After Creation
You can always modify which triggers activate this workflow:
- Open your workflow from the workflows list
- Look for the trigger management section at the top of the page
- Click "Edit" to add or remove triggers
- Save your changes

Trigger management panel showing assigned triggers at the top of the workflow page
Tips for Your First Workflow
🎯 Start Simple
Begin with 2-3 outputs in your decision node. You can always add more paths later.
📝 Clear Instructions
Write detailed instructions for decision nodes so the AI understands exactly what to look for.
🧪 Test Everything
Test each path with realistic conversation examples before going live.
📊 Monitor & Improve
Check execution logs regularly and refine your workflow based on real results.
💡 Remember: Workflows are powerful automation tools that improve over time. Start simple, test thoroughly, and gradually add complexity as you understand your automation needs better.